Automated Redaction Outputs
Extract Systems’ Automated Redaction Output
I’m going to give you a brief demo of the redaction process and how redacted images can be output in a couple different ways, and how they would get back into your document management system.
We are going to look at an image, and I want to show you that there’s an SSN here. There is another one here and both have no redaction applied. What we’re going to simulate is a document management system or another mechanism for exporting data into the Extract Platform.
In this case, I’m going to simulate that by copying to a folder that the Extract redaction platform is monitoring. In the background, Extract processes the image. It will first pick up the images and then will start processing it. In this case, you see two output files. The first one is the OCR output and the second one is the rules output.
Extract’s Verification Process
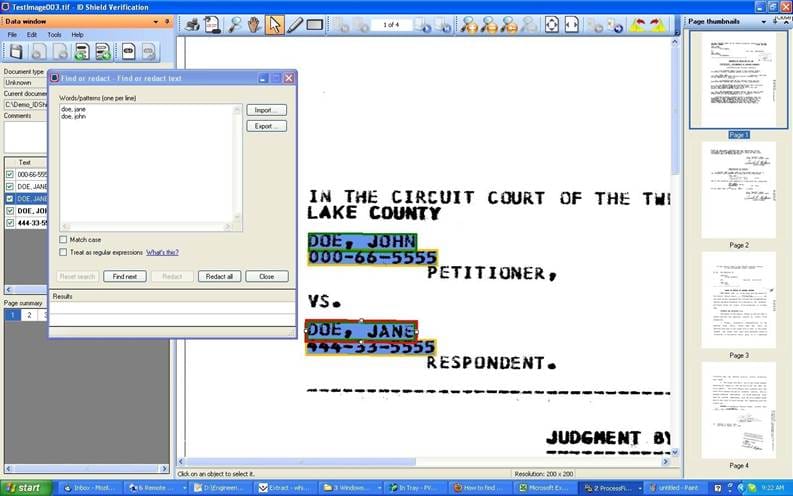
At this point, somebody can begin the verification process. Now, I can hit play and go into verification. You can see a Social Security Number has been identified. In this case, the shaded bluish-gray box indicates that a redaction will be applied there.
If I hit tab and go to the next one, you’ll see that one as well. As I tab through, and I go through each page and each redaction, it will automatically go to the next image if there is one. You can see as soon as that one is done, the output folder showed up with a file. I have another image and an XML file.
Outputting Redaction Data
There are two different ways you can output the data. We can output to another folder location and the images will be picked up by the document management location or in this case, XML. If we look at the image, we can see that a redaction is implied and it even tells you what kind of redaction. There’s an SSN under there. The other types of format that we can output is an XML.
We can open that. This is for those of you that want to have the spatial data and apply it yourself. We have the data. You can see the types and zones for the redactions and the actual location of the file, StartX, StartY. These are the spatial coordinates for you to apply the redaction to the image yourself.
There is another option that we can do to output data. I’m going to launch that secondary process here to show you how we can process another way. I’m going to make a slight modification here. I’m going to go back to my images, and I’m going to drop a secondary image in.
Shortly that image will begin processing. This image came back already, so I’m going to go into the verification process. There’s a couple SSN’s here and I’m just going to tab through them. Instead of creating a file in an output directory, I could use the same name of the file and make it an appendix to that file name. It could include the word redacted and I can convert it to a PDF.
Outputting Different File Types for Redaction
At this point, we’re going to look at the PDF, and you can see here the SSN redaction is applied to the PDF. Those are just a couple of different ways that we can output redacted data. You can copy these to a different network and share. You can copy them to the same folder or can change formats between TIFS, PDFS, and XML. Those are a few different ways you can receive your redacted output.
If you have any questions, feel free to reach out to Extract Systems. You can view similar blogs here: “3 Ways to Redact a Document” and “Extract, redact all my documents.”


